北岛的诗
😭北岛的长诗《白日梦》的第四节
你没有如期归来
而这正是离别的意义
你没有如期归来
而这正是离别的意义
固件中通常包含 boot0、 uboot、 kernel、 rootfs 等镜像。基于经验,各个镜像尺寸的量级如下表所示:
| Image | size |
|---|---|
| boot0 | < 100k |
| uboot | < 1M |
| kernel | 3-15M |
| rootfs | > 4M |
可以看到 boot0、 uboot、 kernel、 rootfs 的尺寸是依次增大的。对于大尺寸的裁剪效果往往比小尺寸的裁剪效果明显,比如 rootfs 裁剪 1M 可能很容易,对于 uboot 来说,则非常困难。因此,后续主要介绍 kernel 以及 rootfs 的裁剪。
1 | #include <execinfo.h> |
硬件上 DDR 确定之后, DRAM 大小就已经确定。
uboot 会根据 DRAM 驱动提供的接口获取 DRAM 的大小,然后修改 dts 中的 memory 节点,Linux 启动时解析 dts 获取 DRAM 的大小。 uboot 启动 log 中会打印 dram 的大小。比如 R329 方案 uboot 启动时会有如下 log:
1 | [01.300]DRAM: 128 MiB |
执行:
1 | root@TinaLinux:/# hexdump -C /sys/firmware/devicetree/base/memory@40000000/reg |
也可以获取 dram 的起始地址与大小。如下面 R329 例子所示,其中 0x40000000 为起始地址, 0x08000000 为 dram 的 size.
1 | procps-ng-top -H -p 899 -w 120 |
shift+p 按照 cpu 使用率对线程排序。如下是一个实例:
LeakTracer 是在检查 C++ 程序内存泄漏时编写的一个小工具。我无法让 dmalloc 显示我想要的内容,我只看到了提到的 __builtin_return_address gcc-extension。
要使用 LeakTracer,请使用提供的 LeakCheck 脚本运行您的程序。它使用 LD_PRELOAD 特性在你的函数之上“覆盖”一些函数(不需要重新编译)。如果您的平台不支持 LD_PRELOAD,您可以将 LeakTracer.o 对象文件添加到 Makefile 中的对象并运行您的应用程序。
LeakTracer 利用 gdb 去输出发生内存泄露所发生的位置,它是通过 override operator new, operator delete, operator malloc, operator free 来实现检测。
系统调用进入内核
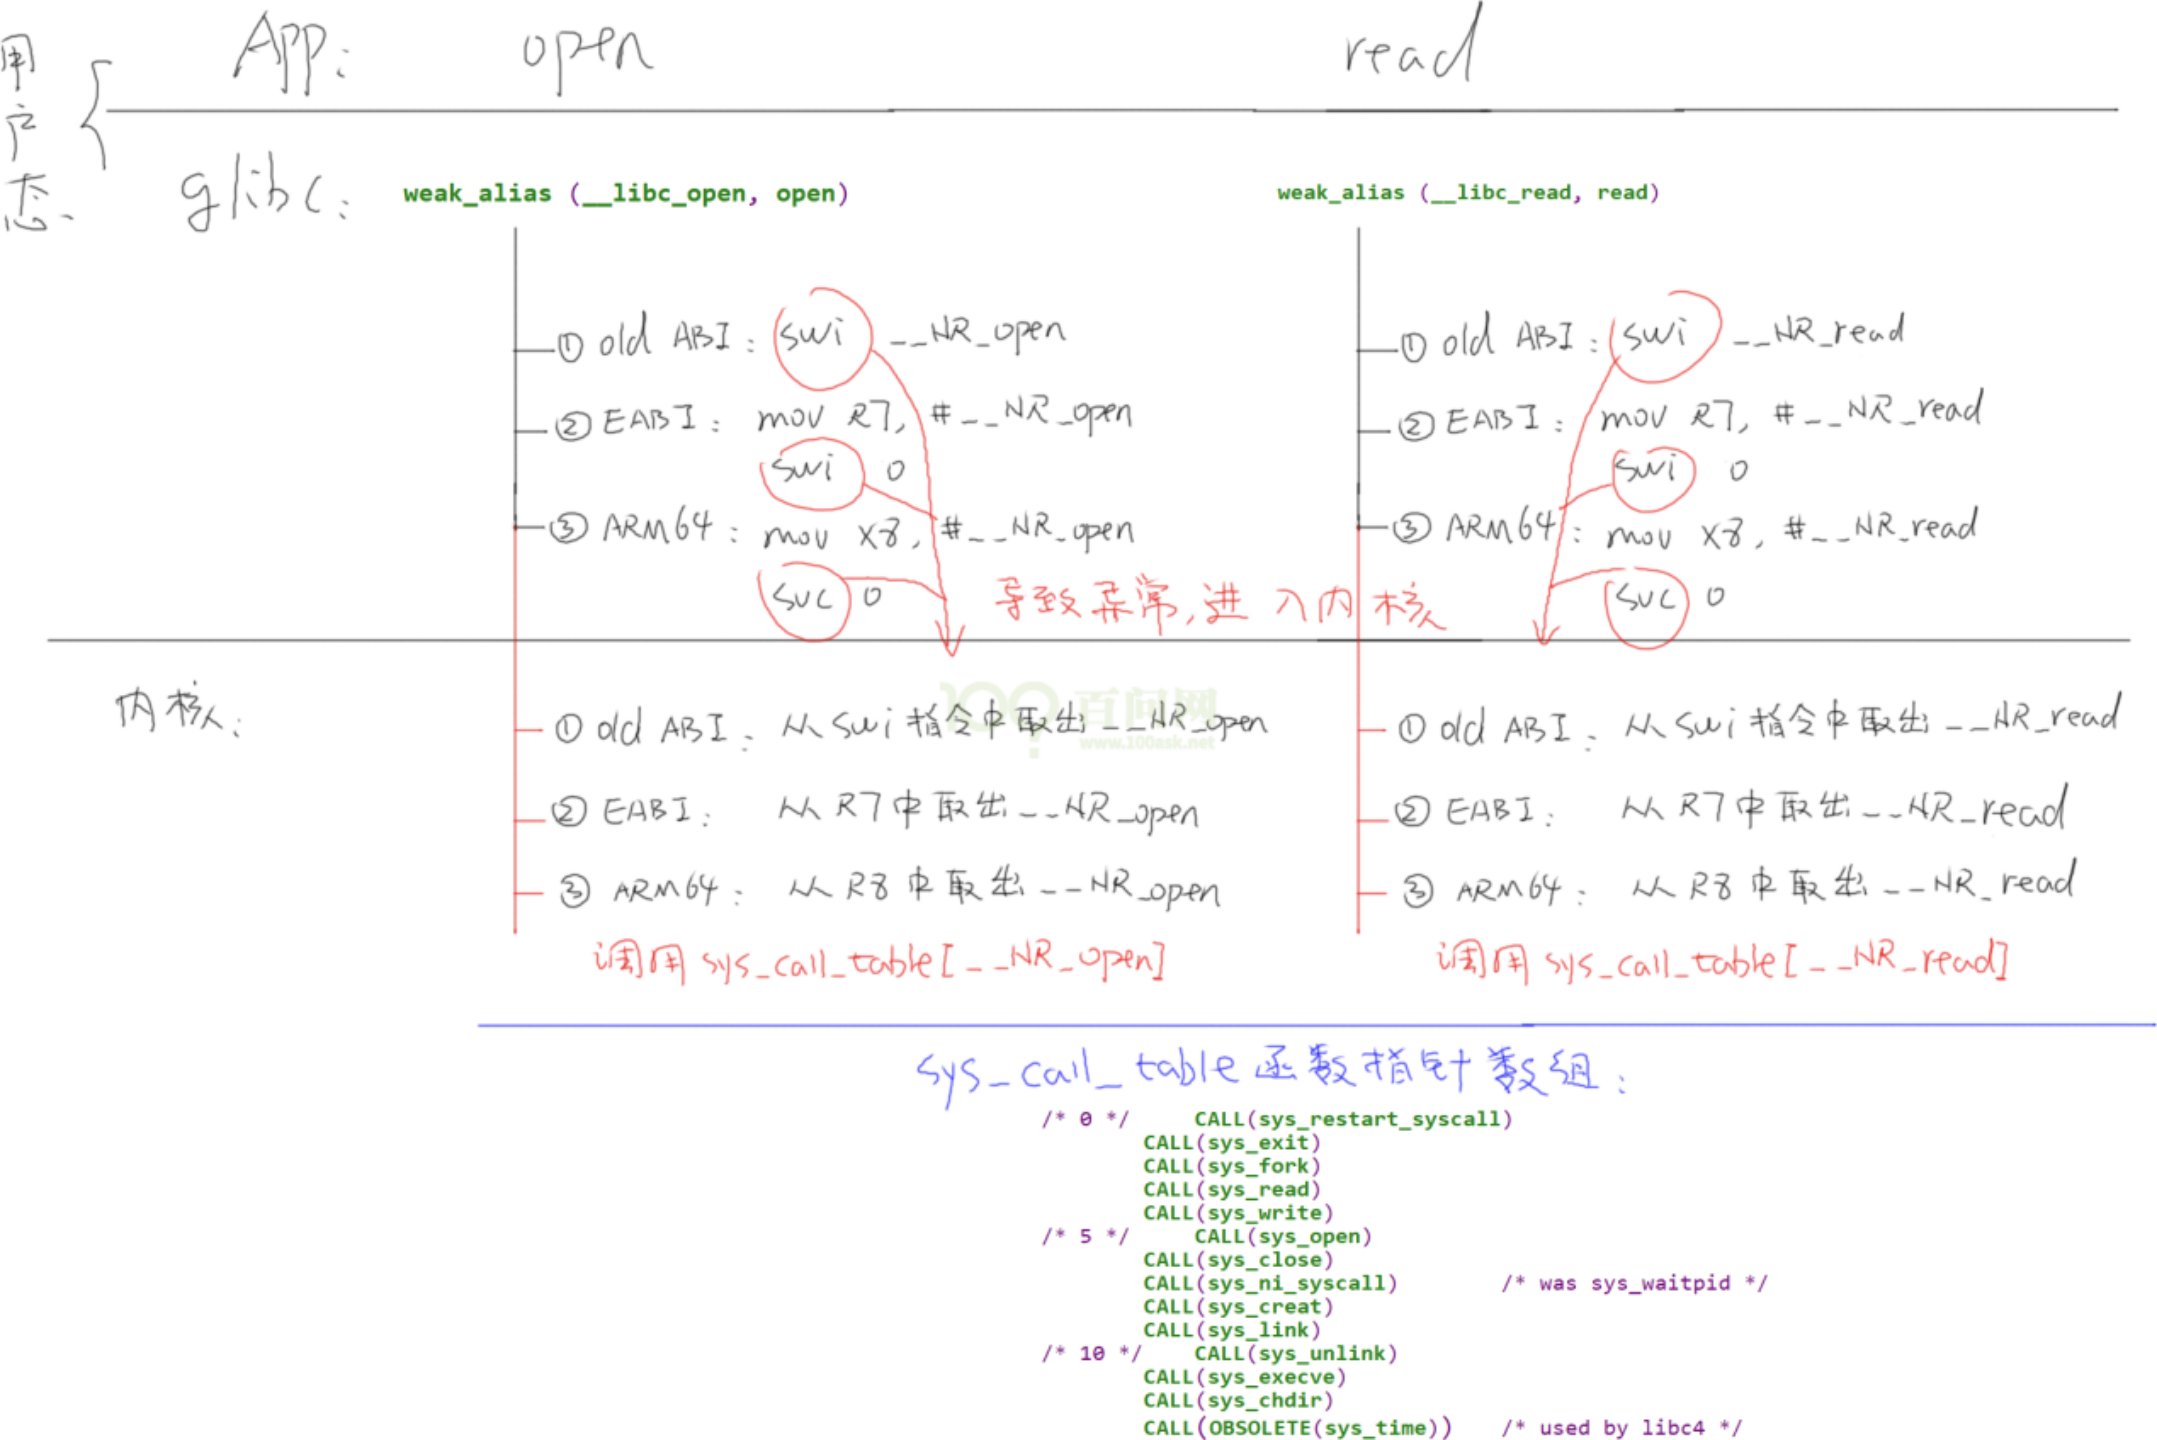
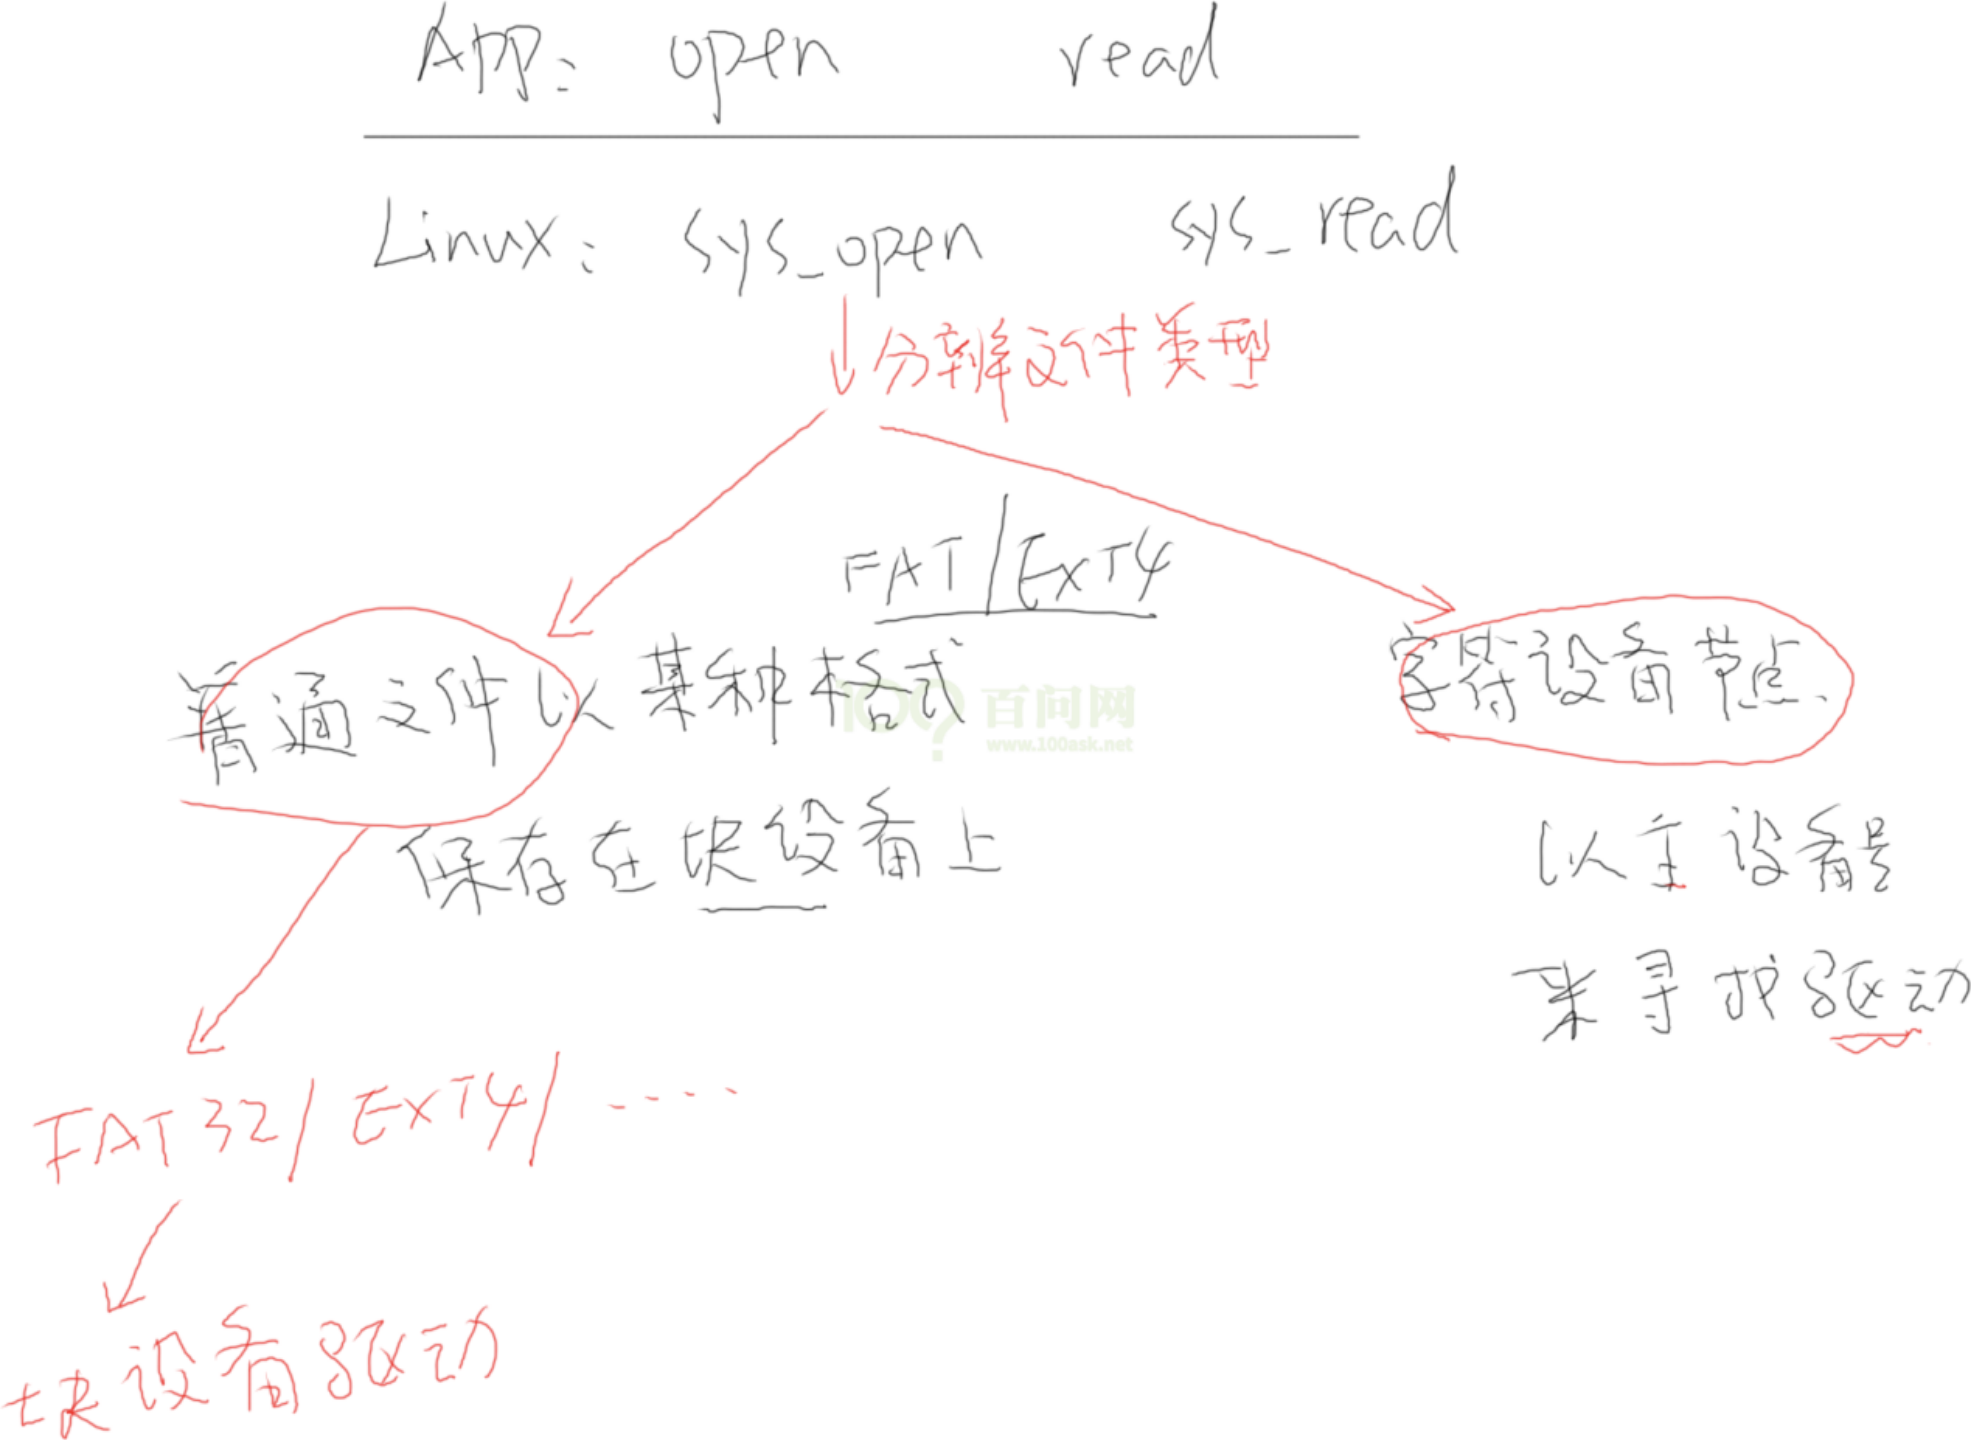
内核的 sys_open、sys_read 做了什么:
设置 sources.list:
1 | sudo sh -c 'echo "deb <http://packages.ros.org/ros/ubuntu> $(lsb_release -sc) main" > /etc/apt/sources.list.d/ros-latest.list' |
设置 keys:
1 | sudo apt-key adv --keyserver 'hkp://keyserver.ubuntu.com:80' --recv-key C1CF6E31E6BADE8868B172B4F42ED6FBAB17C654 |
安装:
1 | sudo apt-get update |
设置环境:
1 | echo "source /opt/ros/kinetic/setup.bash" >> ~/.bashrc |
安装依赖:
1 | sudo apt install python-rosdep python-rosinstall python-rosinstall-generator python-wstool build-essential |
初始化 rosdep:
1 | sudo apt install python-rosdep |
1 | ffmpeg -i "concat:file_name1.ts | file_name2.ts" -c copy_out.ts |
1 | ffmpeg -i output.ts '%d.png' |
一个简单的 Makefile 文件包含一系列的“规则”,其样式如下:
1 | 目标 (target)…: 依赖 (prerequiries)…<tab>命令 (command) |
通常,如果一个依赖发生了变化,就需要规则调用命令以更新或创建目标。但是并非所有的目标都有依赖,例如,目标“clern”的作用是清除文件,它没有依赖。 规则一般是用于解释怎样和何时重建目标。
make 首先调用命令处理依赖,进而才能创建或更新目标。当然,一个规则也可以是用于解释怎样和何时执行一个动作,即打印提示信息。一个 Makefile 文件可以包含规则以外的其他文本,但一个简单的 Makefile 文件仅仅需要包含规则。虽然真正的规则比这里展示的例子复杂,但格式是完全一样的。
对于上面的 Makefile,执行“make”命令时,仅当 hello.c 文件比 hello 文件新时才会执行命令“arm-linux-gcc –o hello hello.c”生成可执行文件 hello;如果还没有 hello 文件,这个命令也会执行。 运行“make clean”时,由于目标 clean 没有依赖,它的命令“rm -f hello”将被强制执行。