
各gadget驱动配置
Gadget驱动简介
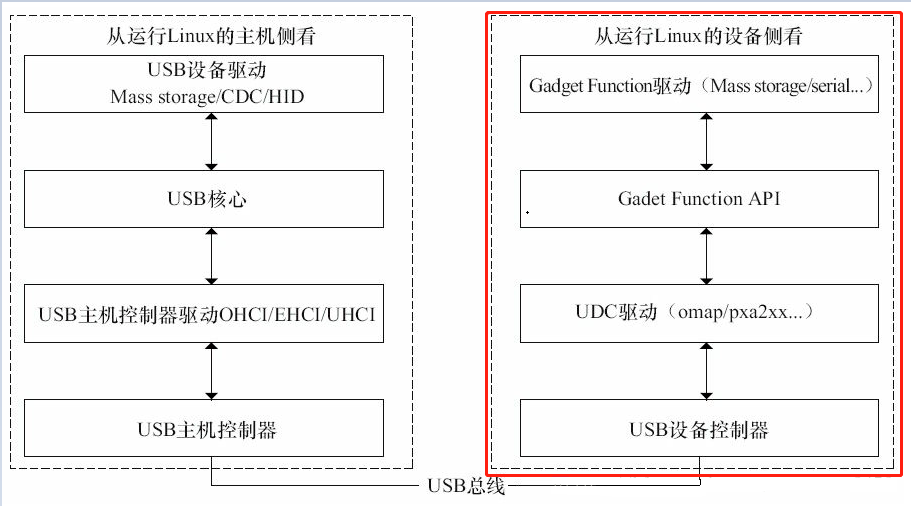
usb驱动分为主机测设备驱动UHC和从机测设备驱动UDC。其中Gadget(意为小器件)就是从机测驱动,包含各种usb外设驱动,常见的有usb声卡驱动、usb网卡驱动、usb串口驱动、u盘、usb鼠标键盘等。其驱动层次如下图所示:
常见Gadget驱动占用ep情况
| EP0 | EP In | EP Out | |
|---|---|---|---|
| ADB | 1 | 1(bulk) | 1(bulk) |
| UAC | 1 | 1(isoc) | 1(isoc) |
| UAC FU | 1 | 1(int) | 0 |
| UAC Async | 1 | 1(int) | 0 |
| HID | 1 | 1(int) | 1(int) |
| MTP | 1 | 1(bulk) | 1(bulk) |
| RNDIS/ACM(CDC) | 1 | 2(int + bulk) | 1(bulk) |
我们A4/A5拥有的EP资源为EP0 + 3对EP(3个EP In + 3个EP Out),A1 拥有的资源为EP0 + 5对EP(5个EP In + 5个EP Out)。同时开启的功能占用EP资源数不能超过芯片支持的EP数。
Configfs配置步骤
usb gadget相关驱动基本上都是通过configfs配置的,使能一个module的方法就是在驱动中使能相应模块的config,例如我们要使能hid,只需要以下三个步骤即可:
-
使能相应驱动配置
1
CONFIG_USB_F_HID=y
-
在configfs中配置相应模块,这个配置的目的是使能相应的模块,并配置其功能,比如这里的HID配置是使能Volume±、Play/Pause、Mute
1
2
3
4
5
6
7
8
9
10
11
12
13
14
15
16
17
18
19
20
21
22
23
24
25
26
27
28
29
30
31usb_f_hid_init()
{
cd /sys/kernel/config/usb_gadget/amlogic
echo "hid" > strings/0x409/configuration
mkdir functions/hid.0
echo 1 > functions/hid.0/protocol
echo 1 > functions/hid.0/subclass
echo 8 > functions/hid.0/report_length
# Report descriptor, include volume up/down mute and play/stop, do not change it easily
# 0x05, 0x0c // USAGE_PAGE (Consumer Page)
# 0x09, 0x01 // USAGE (Consumer Control)
# 0xa1, 0x01 // COLLECTION (Application)
# 0x09, 0xe9 // USAGE (Volume Increment)
# 0x09, 0xea // USAGE (Volume Decrement)
# 0x09, 0xe2 // USAGE (Mute)
# 0x09, 0xcd // USAGE (Play/Pause)
# 0x09, 0xb5 // USAGE (Scan Next Track)
# 0x09, 0xb6 // USAGE (Scan Previous Track)
# 0x15, 0x00 // LOGICAL_MINIMUM (0)
# 0x25, 0x01 // LOGICAL_MAXIMUM (1)
# 0x95, 0x06 // REPORT_COUNT (6)
# 0x75, 0x01 // REPORT_SIZE (1)
# 0x81, 0x02 // INPUT (Data,Var,Abs)
# 0x75, 0x02 // REPORT_SIZE (2)
# 0x95, 0x01 // REPORT_COUNT (1)
# 0x81, 0x03 // INPUT (Cnst,Var,Abs)
# 0xc0 //END_COLLECTION
echo -ne "\x05\x0c\x09\x01\xa1\x01\x09\xe9\x09\xea\x09\xe2\x09\xcd\x09\xb5\x09\xb6\x15\x00\x25\x01\x95\x06\x75\x01\x81\x02\x75\x02\x95\x01\x81\x03\xc0" > functions/hid.0/report_desc
ln -s functions/hid.0 configs/amlogic.1/hid.0
cd -
} -
添加到start函数中,start函数中的执行顺序是:
1
2
3
4
5
6
7
function start_usbgadget() {
basic_setup
usb_f_hid_init
# 将配置绑定到特定的USB上
echo $udc_value > /sys/kernel/config/usb_gadget/amlogic/UDC
}
其他模块也都是类似的添加步骤。
各模块配置参数
base配置
1 | basic_setup() |
adb配置
配置configfs
1 | usb_adbd_init() |
UAC配置
使能uac驱动
1 | CONFIG_USB_U_AUDIO=y |
配置configfs
1 | usb_f_uac_init() |
对于kernel6.6,默认开启FU和ASYNC,如果要关闭这两个模块添加如下即可:
1 | # 关闭FU |
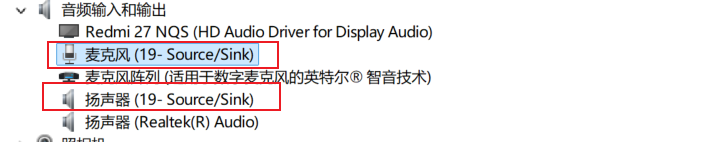
验证
成功后设备管理器中会增加以下两个设备。
HID配置
使能hid驱动
1 | CONFIG_USB_F_HID=y |
配置configfs
1 | usb_f_hid_init() |
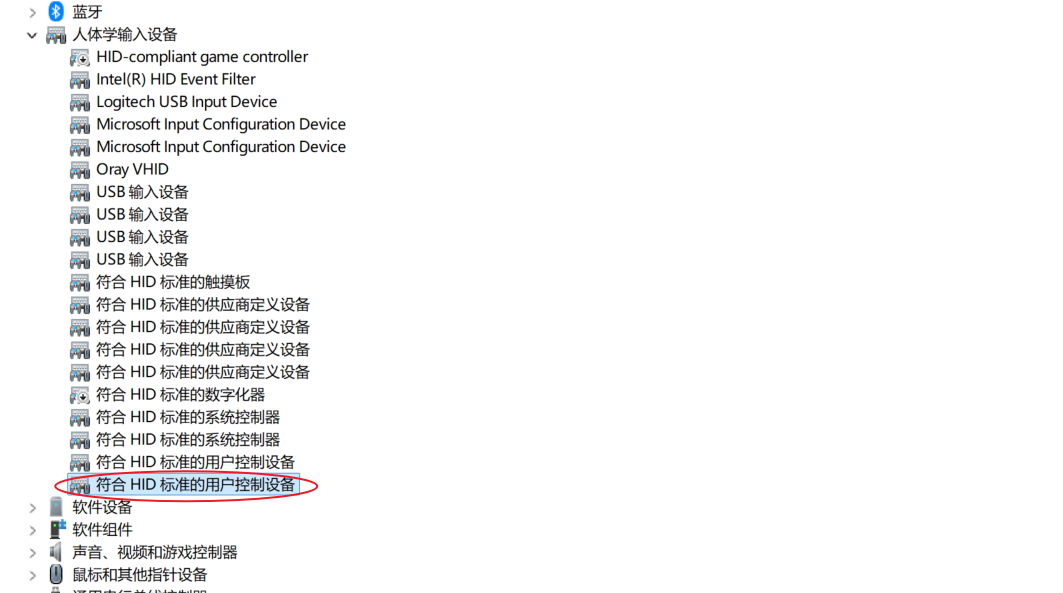
验证
编译烧录后会发现设备管理器中多一个HID标准用户输入设备。
MTP配置
buildroot添加umtprd这个package:uMTP-Responder. umtprd用来实现板端的MTP功能。
配置configfs
1 | usb_mtp_init() |
验证
编译烧录后可以在pc上看到u盘符代表安装成功。
RNDIS配置
使能rndis驱动
1 | CONFIG_USB_F_RNDIS=y |
配置configfs
1 | usb_rndis_init() |
验证
由于RNDIS需要在windows平台上单独安装驱动,这个暂时未做验证,详细可以参考https://confluence.amlogic.com/display/~tao.qin/C3+USB+RNDIS
ACM配置
使能ACM驱动
1 | CONFIG_USB_F_ACM=y |
配置configfs
1 | usb_acm_init() |
验证
编译烧录后可以在pc上看到以下串口设备代表安装成功

相关推荐


评论
WalineTwikoo